
I had my first touch with OneTrust in 2018. Since then, I’ve worked with the tool many times as it remains one of the market’s most popular consent management platforms (CMP).
OneTrust is supposed to be easy. They offer an autoblock solution that should automatically block the scripts that don’t have the necessary consent. However, the reality is often not that easy.
This post explains how to integrate OneTrust with the consent configuration feature in Tag Manager. The integration allows enabling Basic Consent Mode or Advanced Consent Mode in Google tags. However, the post’s main focus is on managing the consent preferences in GTM in general, including non-Google tags as well.
Post updates
- 2023-12-15: Include support for Consent Mode V2 parameters (ad_user_data & ad_personalization) in the GTM Consent Configuration template.
OneTrust Autoblock
While autoblock usually works, it falls short in plenty of cases.
One such case of failure is when the tracking is done simply by loading a pixel instead of injecting a script. Autoblock focuses only on blocking scripts.
Another case when autoblock falls short is when a tracking script is bundled inside another script file. In this case, autoblock could block the whole script file and break some of the site’s functionality.
Then there’s the case when it’s not enough just to block or allow a script. Some of the script’s features might not require consent, while others should only be enabled after consent.
What’s the value of having an autoblock solution that you can’t trust? Not much.
The best solution is to ensure that all tracking scripts are managed in one place in Tag Manager. Once the management of the tracking scripts is centralized, there’s no need for a clumsy and unreliable solution such as autoblock.
Difficulties in Integrating Onetrust with Google Tag Manager
OneTrust is not exactly the best when it comes to aligning the tags in GTM with the consent selections of the visitor.
The usual difficulties in having GTM in sync with the consent preferences are related to the timing of when this information becomes available.
OneTrust offers many dataLayer events to make the consent selections available for GTM.

However, these dataLayer pushes contain a lot of overlap. Probably the reason for that is backward compatibility. Over the years, OneTrust realized that the dataLayer events they initially created were insufficient. Instead of updating the existing ones, they’ve just added new ones.
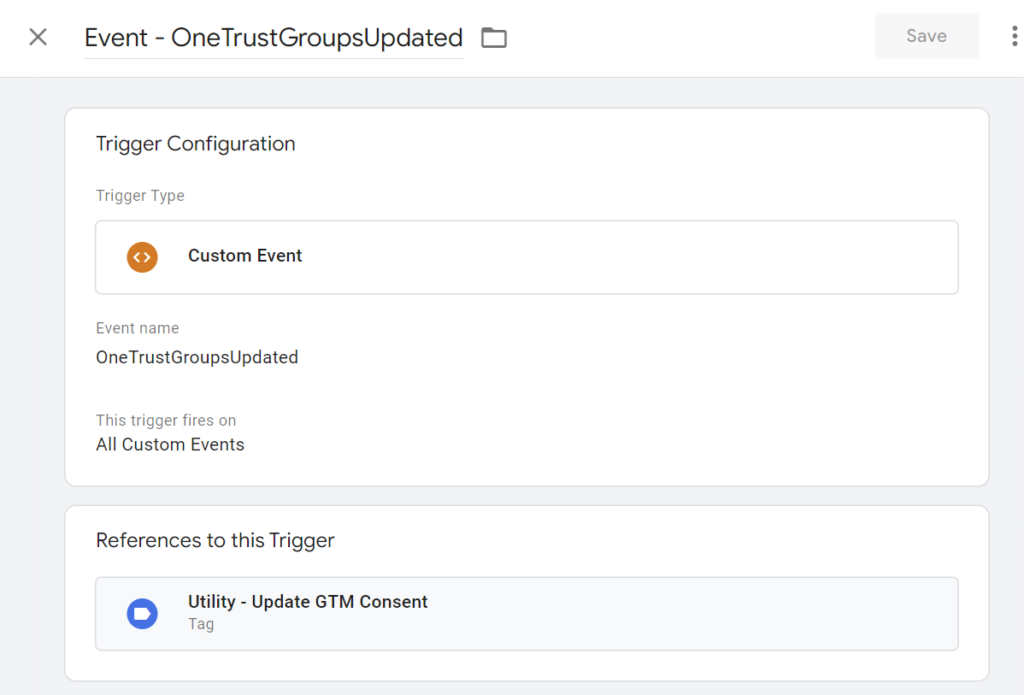
Currently, the main dataLayer push to look at is called “OneTrustGroupsUpdated.” OneTrust pushes that event whenever the script is loaded, or the visitor updates their consent preferences.
The rest of the dataLayer pushes are legacy.
So, OneTrust has made the information on consent changes available. What’s the difficulty?
OneTrust is not the lightest resource you can load on your website. The initial otSDKStub.js script loads many additional resources before OneTrust is ready to operate.
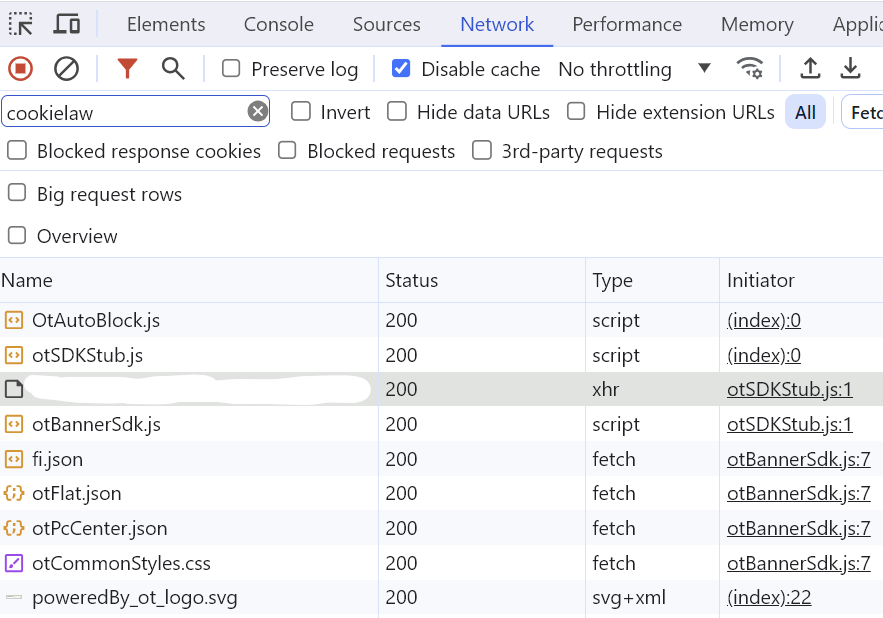
GTM uses an asynchronous script that’s supposed to load as early as possible when the page is loaded so that the analytics events don’t get a long delay. Usually, when OneTrust has finished loading, and the consent information is available in the dataLayer, the GTM script has already been executed and has attempted to fire the first tags in the container.
Because of that, if we want to rely entirely on the OneTrust dataLayer pushes, we need to delay everything in GTM until they happen. That would, of course, not be very nice.
Here are a few solutions I’ve used over the years for handling the timing-related issues with OneTrust consent selections:
- Implementing consent banner button click tracking to capture consent status updates
- Implementing clumsy custom JS solutions to detect when the OneTrustGroupsUpdated dataLayer event actually includes an update in the consent selections instead of just the initial state read from the OptanonConsent cookie.
- Using trigger groups to capture the “consent granted” event when the tracking scripts can be enabled for a new visitor.
Clearly, these have been less than ideal.
GTM consent configuration
GTM’s consent configuration is a great feature that allows managing the consent state inside GTM and aligning the tags with that.
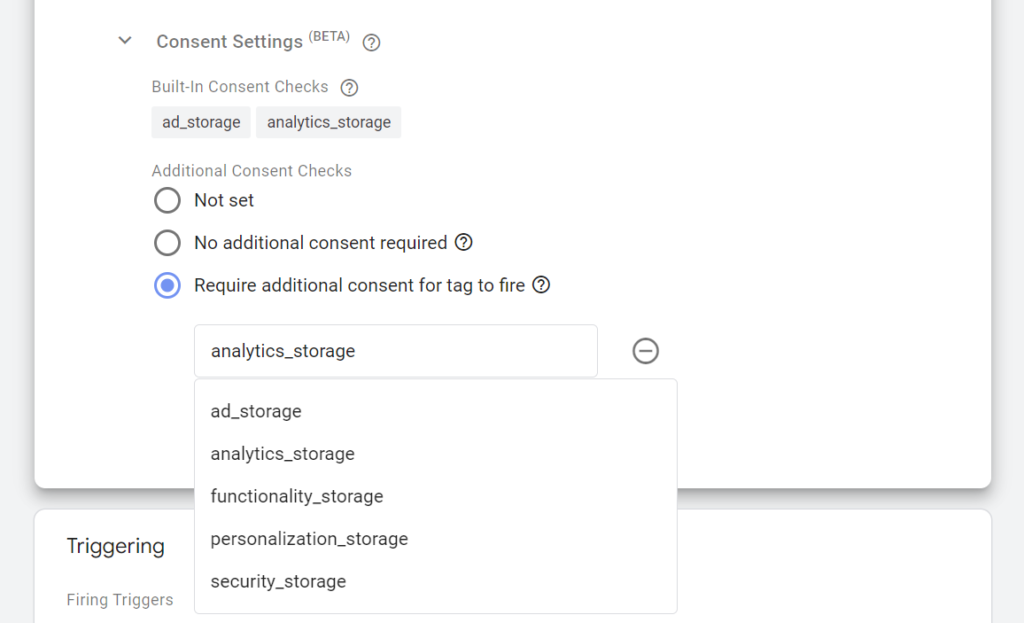
Once you’ve integrated your CMP with the GTM consent configuration, you can align any tag with the consent selections by including additional consent checks. The additional consent checks block the tag if the necessary consent has not been granted.
Blocking the tags that didn’t have the required consent is what Google refers to as Basic Consent Mode in their latest documentation. Basic Consent Mode is the safest option for respecting the visitors’ choices as it doesn’t allow the trackers to collect “anonymous” pings from visitors who didn’t grant consent.
Blocking the tags before consent and

Tags can also have internal consent checks. Their behavior is defined by whoever created the tag template. With Google tags, the internal consent check will allow the tag to execute, but with limited features, for example, by blocking storage access.
If you’d like to block the tags instead, you can always include an additional consent check in the tag.
The consent overview feature in GTM includes a nice view for checking which tags are linked to which consent levels.
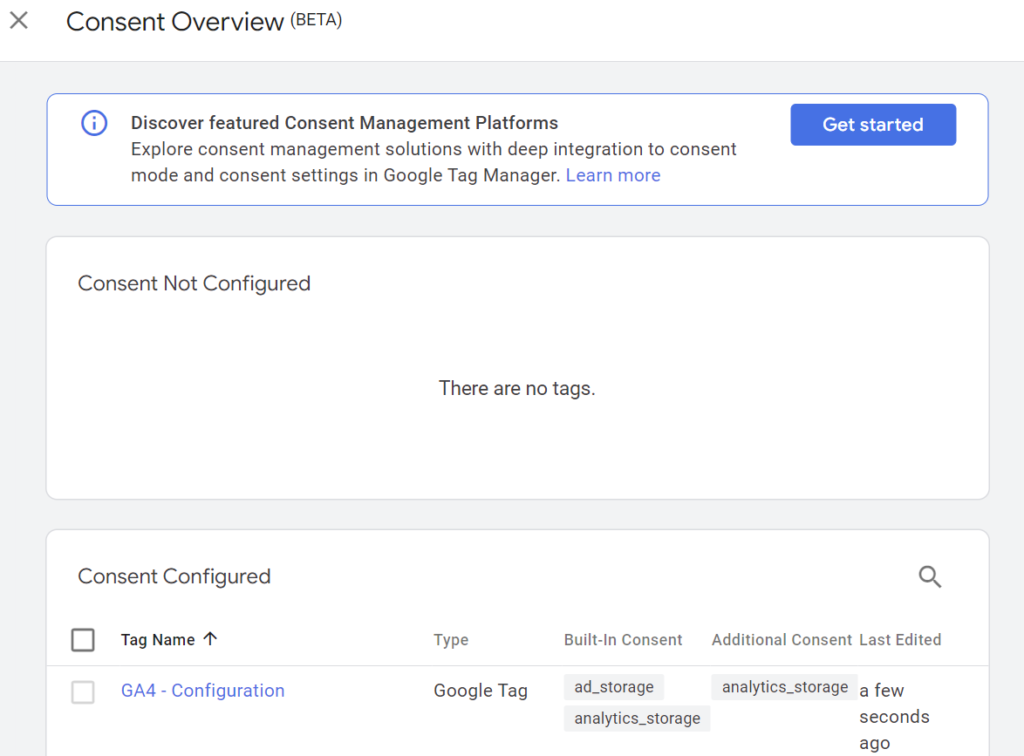
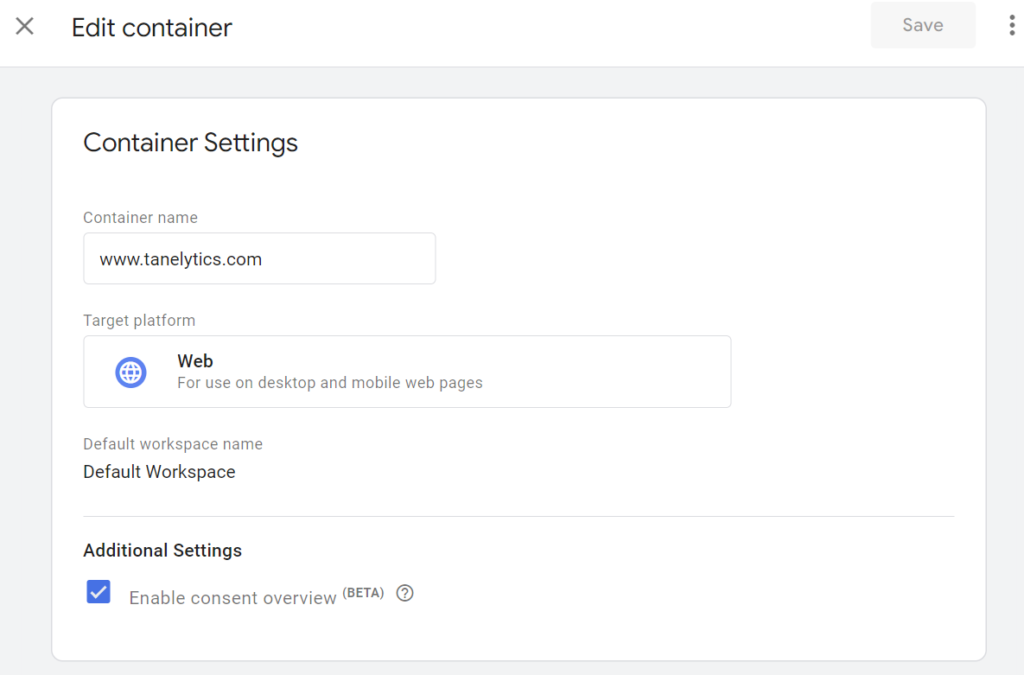
You can enable the consent overview in your container’s settings.
Installing the OneTrust script
How to install the OneTrust script is not really in the scope of this article. However, I will share a few thoughts on what to consider when installing the script.
Firstly, I would prefer not to install OneTrust through GTM.
In my opinion, GTM should mainly be used for managing tracking codes and not for injecting new content, such as a consent banner, into the DOM.
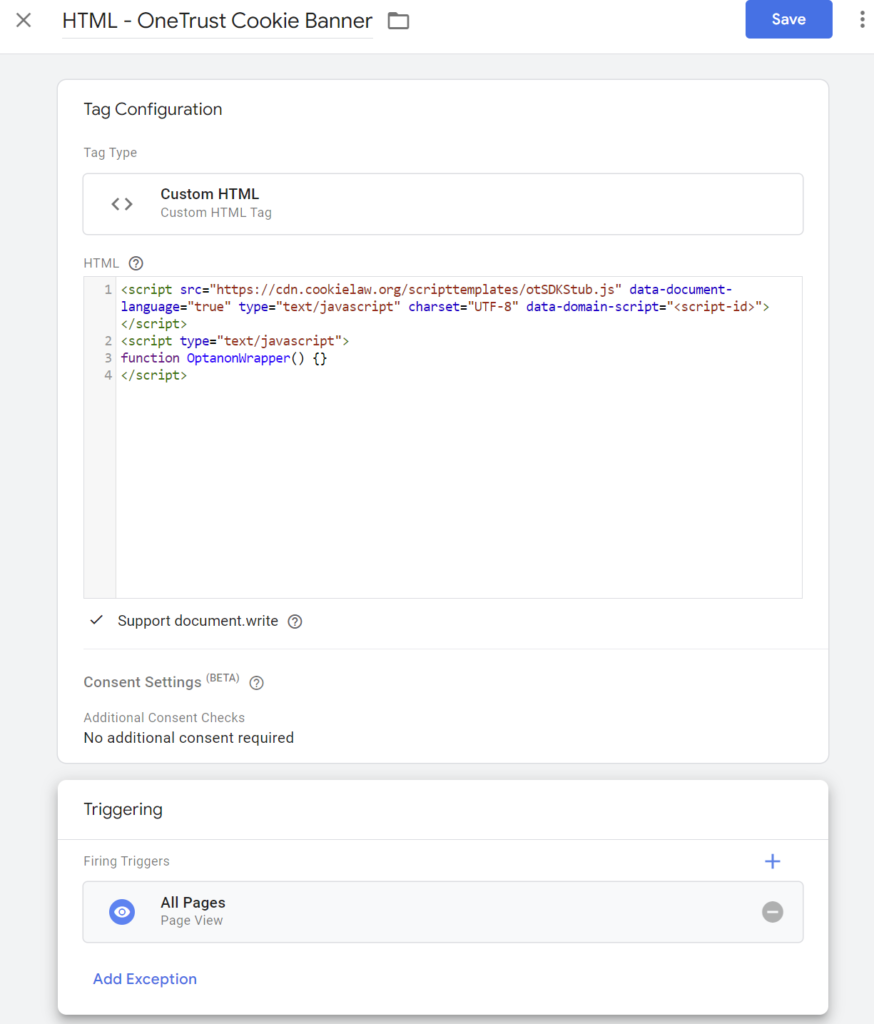
However, in some cases, using GTM could be the only option you have. In that case, you can implement the scripts using a custom HTML tag. Just remember to check the “Support document.write” setting in the custom HTML tag!
Integrating the consent preferences between OneTrust and GTM will work just as well, even if you install the OneTrust script through GTM. Also, the integration does not rely on the OneTrust script loading as fast as possible. So, there’s no need to configure setup tags or anything else additional to get the script to load before the consent preferences are communicated to GTM for the first time.
Technical setup – How to integrate OneTrust with GTM
To get started, we need to set up two things:
- Access the latest consent state, whether from the dataLayer or from the OptanonConsent cookie.
- Feed the consent status into GTM’s consent configuration model.
Once these are in place, each tag in GTM can be aligned with the visitor’s consent selection by utilizing the additional consent checks—no need for blocking triggers.
Accessing the consent state
As mentioned, the latest OneTrust consent status can be fetched by utilizing the dataLayer messages and the OptanonConsent cookie. To make it easier, I’ve created a custom variable template that does it. You can install the template through the GTM template gallery.

OneTrust Consent Groups template
You can use the template to either return the status of the selected consent group, for example, analytics, or to return the status of all consent groups in one JSON object.
Start by creating the following four variables, one for each OneTrust consent groups. The variables are needed later for feeding the data into GTM’s consent model.
- CT – OneTrust – Analytics Consent
- CT – OneTrust – Functional Consent
- CT – OneTrust – Personalization Consent
- CT – OneTrust – Advertising Consent
(CT here stands for Custom Template)
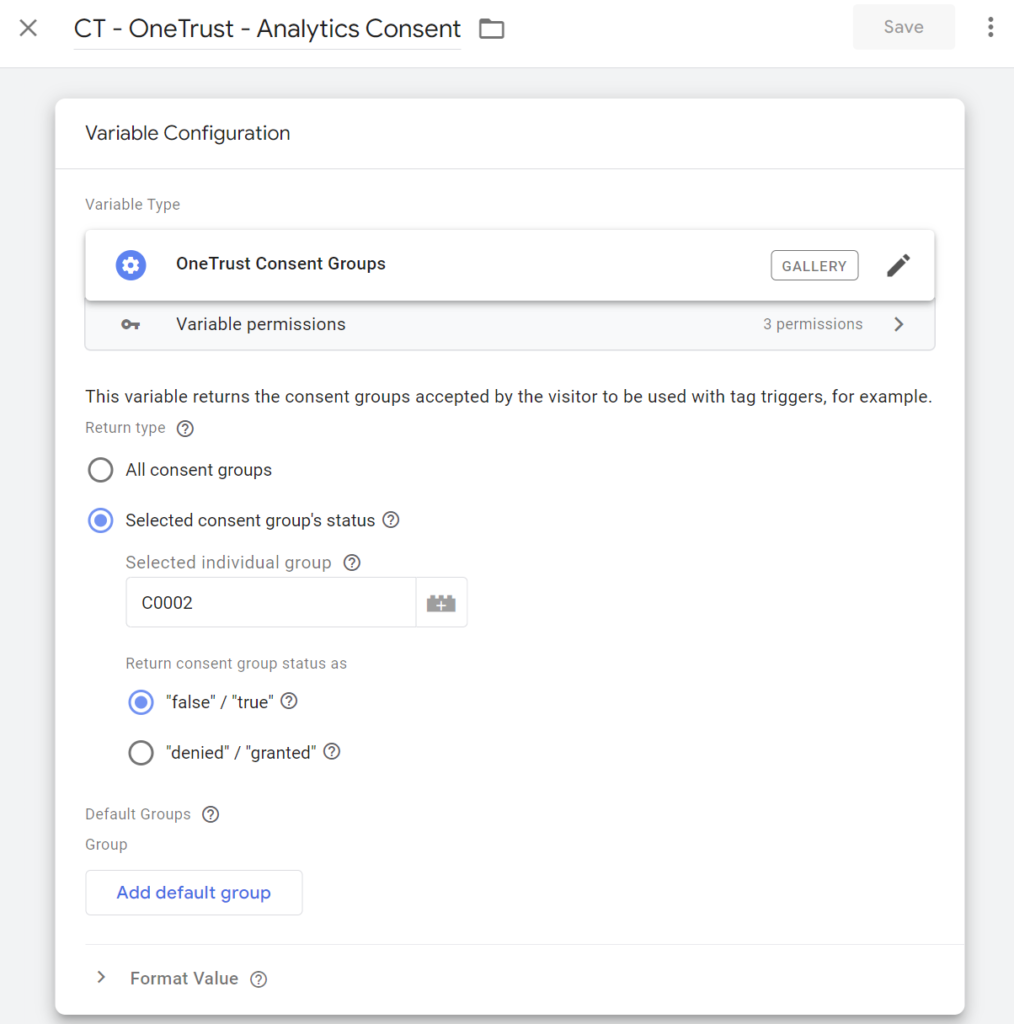
When defining the variables, you’ll need to know the OneTrust codes for each consent group. In this example, “C0002” is the code that links to the analytics (or performance) cookies consent. In another setup, the code could be just “2”. I think different OneTrust versions could have different mappings. Sometimes the mapping could also be customized.
You can select either “true / false” or “denied / granted” for the return format. GTM’s consent APIs use the terms “denied” and “granted”. However, the GTM Consent Configuration tag template in the next step will understand “true” and “false” as well.
Feed the consent selections into GTM’s consent model
GTM’s template APIs have two commands for declaring consent: setDefaultConsentState and updateConsentState.
The default consent is used for declaring the consent selections as soon as possible and before any queued dataLayer events. When done using the Consent Initialization trigger, all tags that are fired during later dataLayer events can access the information.
The consent update command is used whenever the consent selections have already been declared, but there is an update in the preferences.
Start by installing the GTM Consent Configuration tag template from the template gallery.

GTM Consent Configuration template
After adding the template, create two tags: one for declaring the initial consent during page load and one for updating consent selections during the “OneTrustGroupsUpdated” event.
Tag 1: Declare initial consent selections
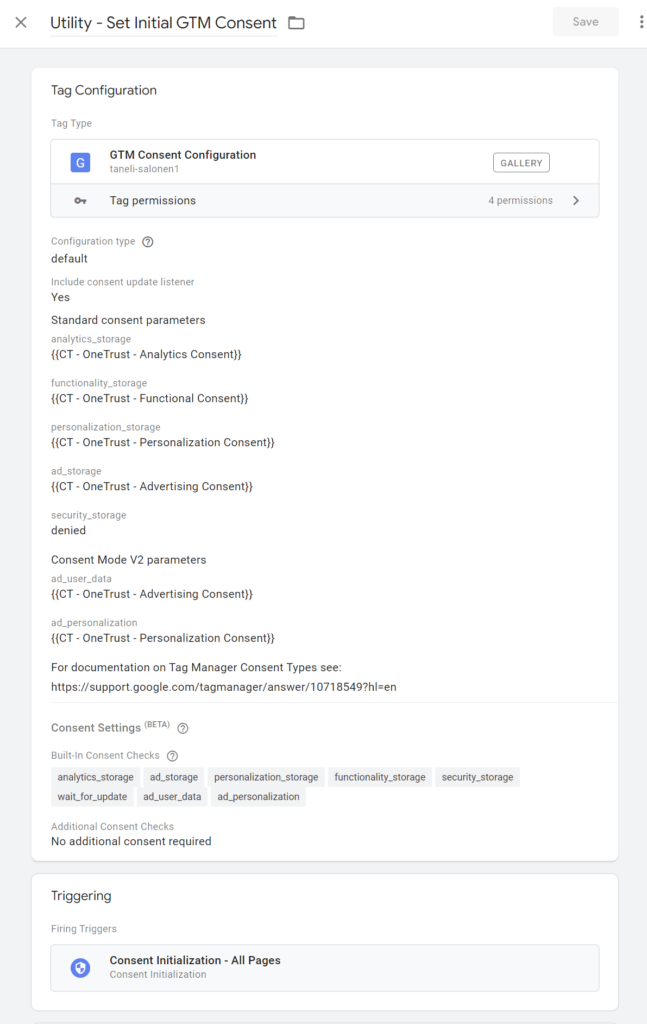
Include the consent update listener. It will generate a dataLayer event whenever the consent preferences of a user change.
The tag should be set to fire as early as possible using the Consent Initialization – All Pages default trigger.
The default consent tag also includes additional settings: region & wait for update. These are entirely optional and can be left empty. In fact, I’d advise against using the regional setting if you intend to implement Basic Consent Mode, where you block the tags by default and fire them as soon as the consent is granted.
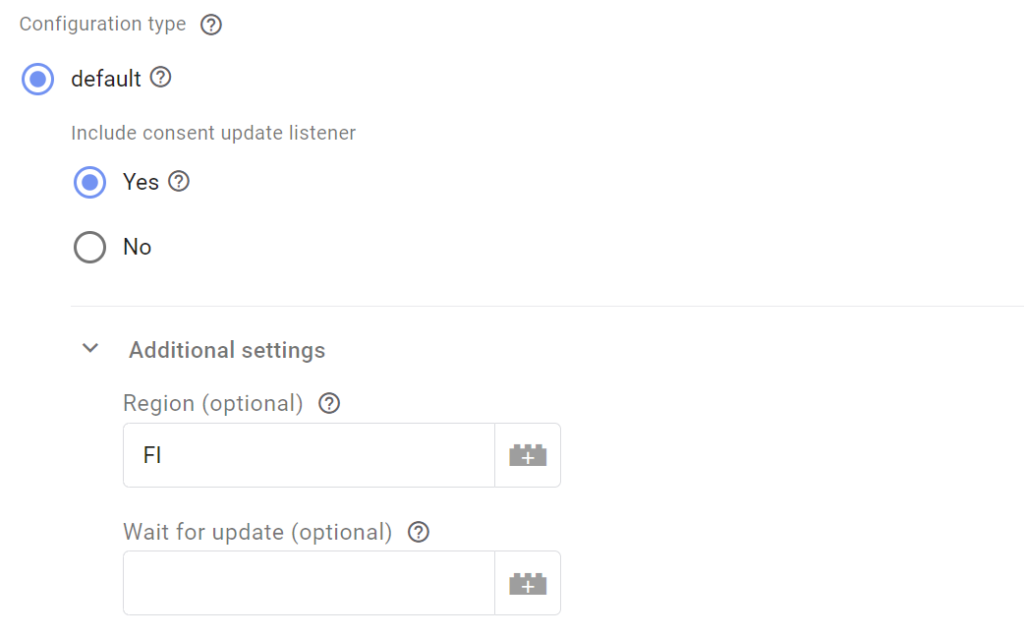
GTM’s consent update listener doesn’t recognize regions. Using the update listener together with regions could cause unintended issues.
For region-specific consent settings, I think using OneTrust’s geolocation rules is best. When OneTrust handles the regions, there’s no need to specify them again for Consent Mode.
Tag 2: Update consent selections
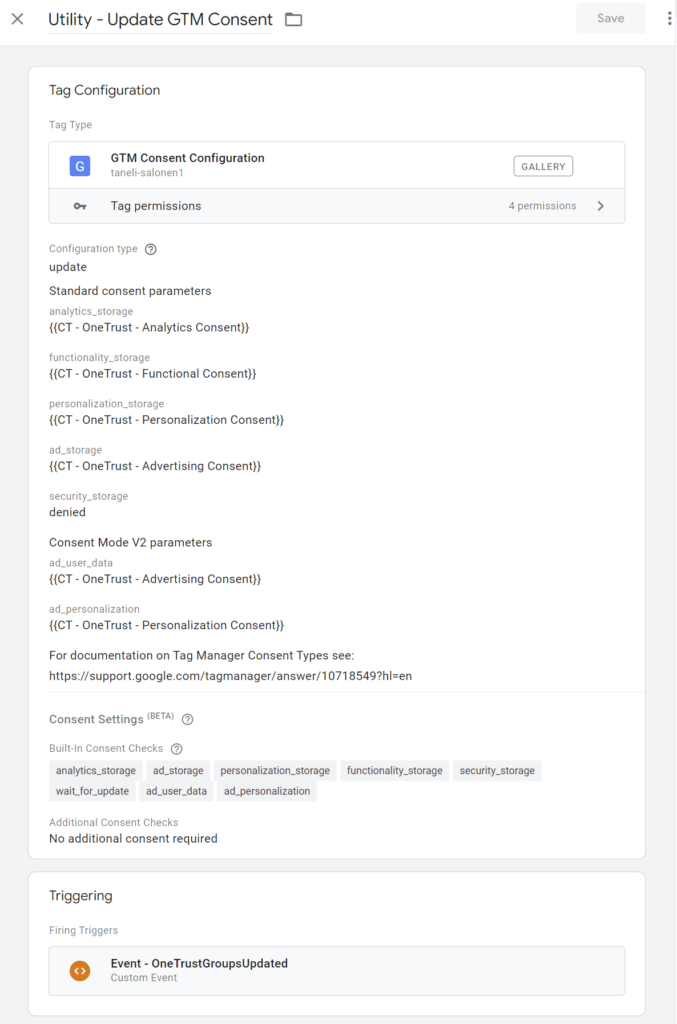
Use the OneTrustGroupsUpdated dataLayer event as the trigger for the update tag. This way, any changes to the visitor’s consent preferences will be communicated to GTM’s consent model.
In addition to the actual consent preference changes, OneTrust sends the OneTrustGroupsUpdated event on each page load. This means that most of the events are irrelevant. However, there’s no harm in running the update tag with these events as well.
The variables used in the tags will default to consent denied if there’s no data in the dataLayer messages or the cookie.
With these two tags, the flow for a new visitor looks like this:
- Each consent selection is set to denied upon page load
- Once the actual preferences are set, the consent levels are updated accordingly
Integrate the tags with the consent preferences
Now that the base setup is in place, the next step is integrating all tags with the consent preferences. If you want to block the tag from firing without the required consent, you should include an additional consent check in the tag’s advanced settings.
Remember to utilize the Consent Overview feature to check for any tags with missing consent checks.
On the other hand, if you want to utilize features such as Google’s Advanced Consent Mode, which collects data without storage access, you should not include an additional consent check. The tags will read the consent preferences in GTM’s consent model and adjust their behavior accordingly.
Consent granted triggers
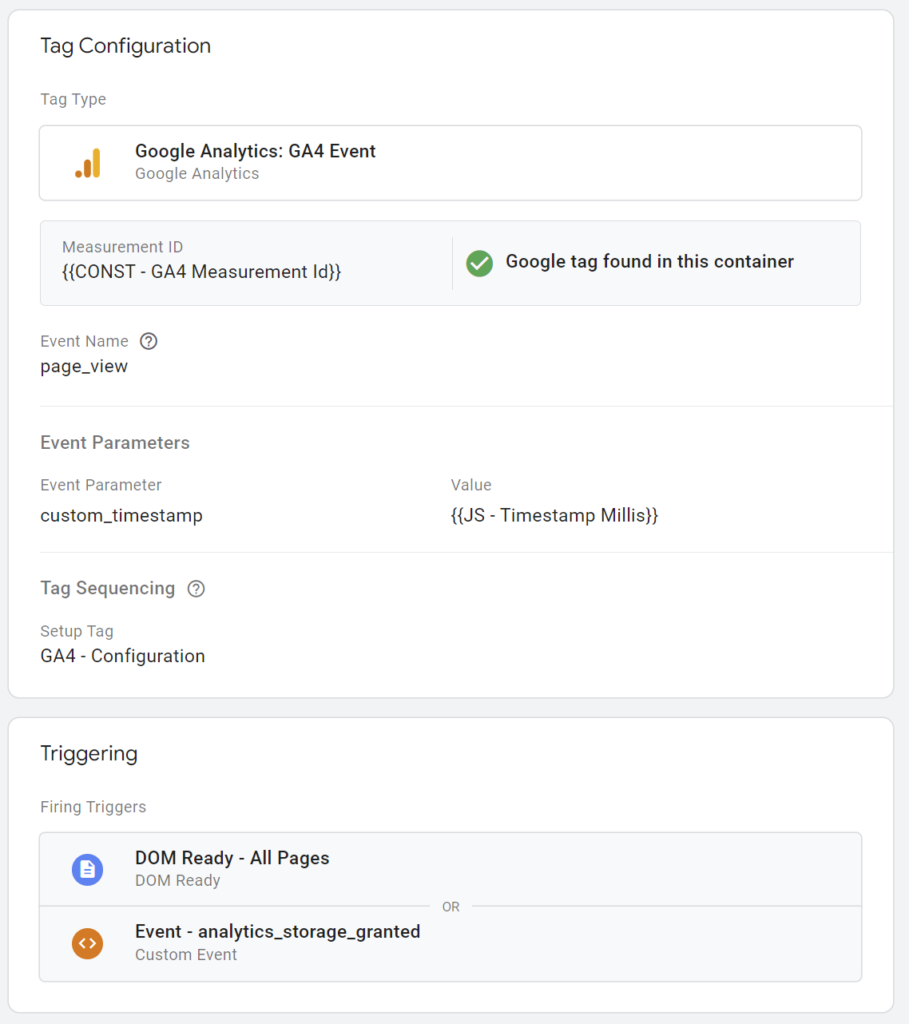
When you want to block the tags from firing without consent, you’ll likely encounter some cases where important data from new visitors could be missed. For example, with Google Analytics, capturing the first page view is essential, as it holds information about the traffic source. The issue is that the visitor won’t have enough time to grant consent before GTM tries to fire the page view tag.
The solution is to set up a consent granted trigger.
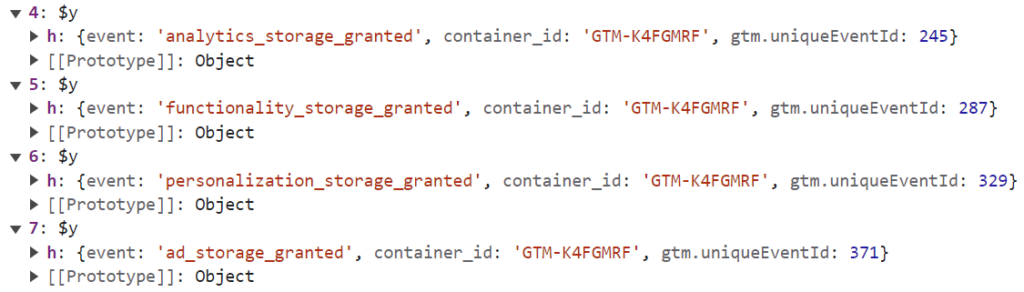
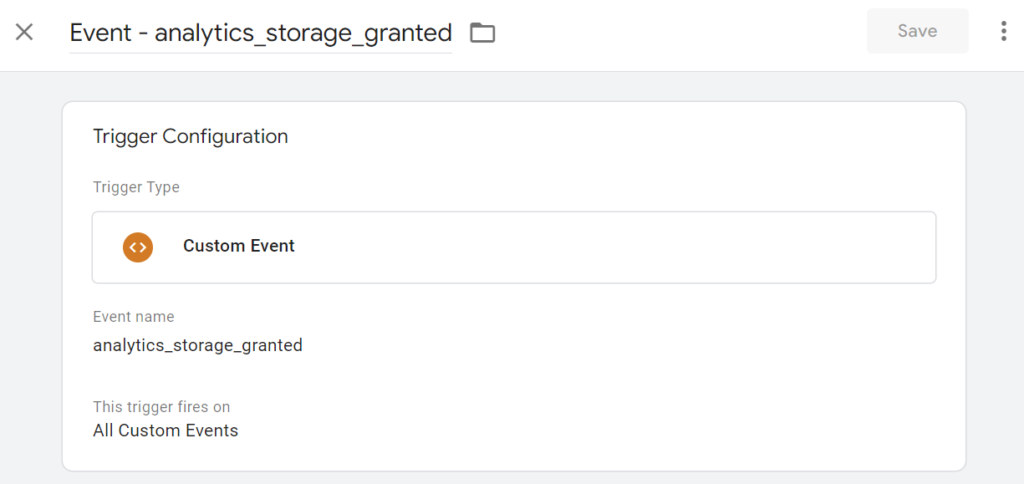
The initial GTM consent tag includes a consent update listener, which will trigger a dataLayer event whenever a consent type that wasn’t previously allowed is granted. You can use these dataLayer events as additional triggers for tags like the GA page view, which should capture the first visited page.
Using the dataLayer events, you can define additional triggers to be added to the tags that require it.
Final thoughts
The consent configuration in GTM is an excellent way to handle the consent integration of individual tags. Before it, we used to rely on blocking triggers, which was a very error-prone way of handling the consents.
While some CMPs do a great job of providing integrations with GTM consent configuration, some don’t. You can use the GTM Consent Configuration tag template referenced in this post to align any consent solution with GTM’s consent configuration. The only thing that is needed is that the data is made available somehow, be it through dataLayer or a cookie, for example.
Hi! Thank you so much for the article, it’s quite helpful. My only concern would be the initial loading of GTM with the consent template and its following applied logic.
Does this integration with consent-mode is also efficient in performance? Escpecially compared to blocking triggers that I currently use.
Hi!
I don’t see any performance issues in this method compared to using blocking triggers.
The consent APIs in GTM are designed to be used like this, so that you set the consent preferences as early as possible using the consent initialization trigger. Basically, what happens during the consent initialization event, is that the dataLayer and the OneTrust cookie are being read by the variables. Then, using that information, the data is communicated to GTM using GTM’s own internal consent APIs. I think these are both very light operations, and I don’t really see how they could degrade site performance compared to blocking triggers. The blocking triggers also require the same data to be accessed and applying the blocking logic to each tag.
Consent mode is then separate thing. It’s built into the Google tags and utilizes this consent selection data that is now integrated to GTM’s consent configuration.
That makes sense! Thank you!
Hello Taneli,
I wanted to express my gratitude for the article you shared; it has proven to be incredibly helpful. I’ve been searching for a guide like this for a while. I’m new to implementing consent management, and I have a question. Can we place the Google Tag on the ‘All Pages’ trigger, or should we stick with ‘Dom Ready’ only? Additionally, we need to use the ‘analytics_storage_granted’ trigger for the Google Tag and all the Events Tags. I’ve already implemented this in one of my containers, and I’ve attached the exported JSON file to the drive(https://drive.google.com/file/d/1sJTpkq2fQrRKbtX73ZWQj7fjf7uLigni/view?usp=drive_link). Could you please take a look and confirm if I’ve set everything up correctly? Your assistance would be greatly appreciated. Thank you!
Hi!
With this solution, you only need to make sure that “set initial consent” tag is fired before the Google Tag. If you fire the initial consent tag using the consent initialization trigger, you can very well use the “All Pages” trigger for the Google Tag. In this solution, the Google Tag does not need to wait for the OneTrust script to have finished loading.
I’ve been using the “analytics_storage_granted” only with the Google Tag (and the page view tag in case you have it as a separate tag).
With the other tags, I’ve just accepted that the events will be missed if they happen before the user grants consent. Capturing those other events, in case they were missed because of consent not yet granted, could be a bit more difficult. For some important events, you could try to utilize the GTM trigger groups, if needed: https://www.simoahava.com/analytics/trigger-groups-google-tag-manager/
Hi Taneli,
Thanks for the great information. I will definitely have a look at the Trigger group.
Hi Taneli!
I really like this template a lot. Have you looked at upgrading it for consent mode v2?
Hi Martin!
The template now includes the two new consent mode v2 parameters. 🙂
Hi Taneli!
Thank you so much for this article. I really appreciate. Do you have any words on if there is anything we should do regarding the consent mode toggle in One Trust itself…. or should it just be kept off?
All the best
Hi,
That’s a redundant step when doing the implementation according to the article.
OneTrust has its own consent mode integration as well, but it would have the same issues regarding delays as what the datalayer events have.
Thanks for this great solution. This is the one that has come closest to 100% consent compliance.
However, I’m still seeing user_engagement events in the browser network call with gcs=100 status if the consent is denied. As this event is not triggered through any tag, I’m unable to control this.
Is there a way to suppress this if consent is denied?
The user_engagement events originate from the config tag. So whatever consent settings are applied to the config also apply to those events. You can apply new consent settings to the config by reloading the tag.
However, I’m not sure if you can stop an already loaded config from sending events in case the visitor has declined consent after having had it granted earlier. In that case, you could trigger a page reload, so the page would be loaded fresh without the gtag script.
Thanks for the reply! I think I can live with this bug as the gcs=100 in which case the hit will be anonymized and will not be used for reporting within GA4 or BigQuery.
I was referring to GTAG bug. And not to the way the consent mode is set up. 🙂
I think that is possible to block these events with this https://developers.google.com/tag-platform/security/guides/privacy#turn-off-analytics
Set window[‘ga-disable-GA_MEASUREMENT_ID’] to true when consent is denied and back to undefined when it is granted.
I am yet another thankful person for bumping into this article! Kudos for your great effort with this article.
https://tagmanager.google.com/gallery/#/owners/taneli-salonen1/templates/gtm-consent-configuration – I am not able to add this template to my workspace. Is it taken down for v2 or something?
I think it could be just some random issues that the template gallery is facing. Not related to the V2 update, because that was already last month.
At least now I can find the template through the gallery.
Hi Taneli,
Thanks for sharing this solution! It works great for me except for the custom events triggered consent update listener, I’m getting multiple entries of them into the dataLayer when I provide my previously denied consent. I see the analytics_storage_granted and other events fired 2-3 times.
Do you know why this could be happening?
Hi,
Do you have multiple GTM containers on the page with all of implementing the similar consent setup? In that case, you’ll also get multiple consent granted events, one per each container.
The consent granted dataLayer events also include a container id field indicating from which GTM container the event was triggered. You can use that parameter to deduplicate the events in your triggers. For example, set the trigger to fire only when event name is “analytics_storage_granted” and container_id is “GTM-12345”.
Hi,
thanks for sharing. I also do not see your consent groups template in the library just the config one can you shared the code for the variables so we can use that instead? thanks!
Hi,
did you check the template gallery in the variables section in GTM, not in the tags section? 🙂
The code can be found here: https://github.com/taneli-salonen1/gtm-onetrust-consent-groups
Hi Taneli!
I have read your article and I have some doubts because who has implemented the OneTrust in our website did things not 100% like you mention. And right now we have a warning in “GA4 Ads personalization consent signals not detected
Action required”
1 – The OneTrust DL was implemented directly in the company’s website
2 – create dl variable OneTrustActiveGroups (your assessing the latest status?)
3 – create triggers: OneTrustGroupsUpdated, Cookie Consent – Analytics (fires in every tags related with GA4 events), Cookie-Consent-Marketing (fires in every tags related with advertising platforms), Cookie-Consent-Personalization (fires only on Optimize tag – outdated)
4 – No Consent tags or Initialization tags were configured.
5 – All tags have the OneTrust Cookie Consent as an exception according to what the tag is referring to
6 – It was created a PV tag with a delay of 0.5secs
And everything is working. Well at least cookies are set when they have to be set, updated when they have to be updated, and blocked when they have to be blocked.
If you want you can test/see it here https://ctt[.]pt
My question is: Why am I seeing that warning in GA4? Shouldn’t be OneTrust just updated “things” in the platform and all done?
Thanks,
João
Hi!
That implementation doesn’t include the Consent Mode V2 signals. It just blocks the tags if the consent was not granted. That’s fine as well, but you won’t be able to use the GA4 data for advertising anymore, if you don’t update the implementation. With Consent Mode V2, the GA4 events need to contain these new consent signals.
OneTrust also has a Consent Mode integration that you can enable. However, I don’t think it works as well as this.
Hi Taneli, great article.
Why do you think OneTrust’s own consent mode integration doesn’t work as well as your GTM solution? Is it about performance or something else?
On our site, we have the OneTrust script and default consent settings (all “denied”) in markup and I have not noticed any problems (yet!).
Hi,
Maybe it works just well in your setup then. 🙂
Also, this post is not so much about Google’s Consent Mode, but mainly about integrating ALL TAGS in GTM with OneTrust using the Consent Configuration feature of GTM, which uses the same consent signals as what Consent Mode uses.
These are the two main issues in my opinion:
1. OneTrust is a heavy resource that often loads late. If you use the additional consent checks in GTM to control all tags, not just Google tags, then the delay will cause major issues, as you’ll need make all your tags wait for OneTrust to communicate the consent preferences.
This is not so much of an issue if you’re only using Consent Mode with Google tags, as the tags themselves can adjust for the consent information coming in late.
2. If you don’t load the tags before consent is granted, then you’ll need a “consent granted trigger” to capture the first time visitors who are yet to make the decision on granting or denying consent. Using that trigger, you can fire your GA4 configuration tag, Facebook Pixel, Hotjar tag etc. as soon as they are alllowed to load. OneTrust doesn’t offer a dataLayer event like that, which means that you’ll need to use some pretty “hacky” solutions (some of which I’ve listed in the post) to get the tags triggering correctly.
This is especially problematic in single-page apps (SPA) where you often want to load the scripts just once, but then keep utilizing the scripts’ methods across the route changes in the SPA.
But again, these issues are mainly related to managing all tags in GTM in general. If you’re using Consent Mode only with Google tags, and are using Advanced Consent Mode, then it shouldn’t matter if OneTrust pushes the consent update events late.
Hi Taneli,
Thanks for your article. With your implementation, I don’t need to active Consent Mode on OneTrust platform, is that correct?
Also, to implement Onetrust I have added blocking for each trigger tag. Should I remove it now with this implementation?
Thanks,
Ludmilla
Hi,
Yes, with this implementation method, you shouldn’t activate the consent mode integration in OneTrust, as the tag template will be used to set the consent types.
Blocking triggers are not needed anymore if you implement “additional consent checks”, as suggested in this post. Additional consent checks are essentially the same as blocking triggers, just a slightly more elegant way of blocking the tags from firing without the required consent.
Hello Taneli,
thanks for the great template!
However, I am not seeing at all the datalayer events for each consent state, that this article refers to. E.g. analytics_storage_granted. Is the datalayer push that is supposed to push these events to the datalayer, not configured correctly in the template, or am I missing something?
Hi!
The template includes the consent update listener only with the consent signals that were set to denied in the default consent tag. That could be one reason.
Another reason could be, if the update happens immediately after the default configuration. It seems that GTM’s consent API’s have changed recently regarding this behaviour.
Hi,
Do I set up the GTM consent regarding analytics_storage, ad_storage, etc. if I am also install the OneTrust script and running OneTrust from the GTM? I guess I am just confused because this implementation is different from what I see in the “Cookie Consent Integration with Google Tag Manager” article on the OneTrust doc site.
I am not sure if you can access that article, but here is the link: https://my.onetrust.com/s/article/UUID-301b21c8-a73a-05e8-175a-36c9036728dc?topicId=0TO1Q000000ItVuWAK#UUID-301b21c8-a73a-05e8-175a-36c9036728dc_section-idm443175179461450
I am using the ” OnetrustActiveGroups” integration.
I think I have 95% of this setup, but I am confused what I set the triggers to when it comes to GA4 Config, Bing Ads, Google Ads Conversion Linker, Hubspot, Meta Pixel, etc.
Ex: Not our company settings, but purely for example sake, see info below.
*Cookie Catergories within OneTrust*
Ad Storage – Targeting
Analytics Storage – Performance
Functionality Storage – Functional
Personalization Storage – Performance
Security Storage – Mandatory
Ad User Data – Targeting
Ad Personalization – Targeting
Would the Bing Ads, Google Ads, and Meta Ads all be BOTH “Targeting Exception Trigger” and “Targeting Firing Trigger” for trigger set up since Ads is set to Targeting?
Would GA4 Config and GA4 Pageview all be BOTH “Performance Exception Trigger” and “Performance Firing Trigger” for trigger set up since Analytics is set to Performance category?
Thank you for any guidance here!
Hi!
Yes, this is a different looking implementation compared to the OneTrust docs. In my opinion OneTrust has been one of the worst CMPs when it comes to offering proper tools for integrating the consents with GTM. That’s why I’ve opted to use a different approach.
I agree! Thanks for the feedback. I am about 98% done with configuration, but I am curious if implementing the above OneTrust configuration are we ALSO enabling (checking) the “Enable consent overview” in the actual GTM container settings and go into each tag and using the Advanced Settings —>Consent Settings (beta)—> and choosing options there whether it be “no additional consent required” or “Require additional consent for tag to fire” ?
Are we doing both or does the above implementation take care of the consent needs when running OneTrust only?
Thank you!
Yes, the consent overview should also be enabled.
Well, it’s not mandatory actually. The additional consent checks will work the same way anyways. The consent overview just gives you better visibility into how the tags have been configured for consent.
Then it’s about going into individual tags and selecting what kind of consent they require. The consent overview will also show you if there are any tags where you forgot to make the selection.
Hi Taneli,
This is a great walkthrough! Is there a way to set up region-specific rules via this method? For example, if I wanted to set the initial permissions as granted for the US and CA region but denied for all other regions, could we do this?
Hi,
Yes, that’s possible with the latest version of the template. When you select the default configuration type, click on the “Additional settings” below that. There you can set the regions.
However, the regions don’t work that well with the consent update listener, so you need to be careful with that, if you are using the update listener as well. Make sure to include the listener in only one default consent tag. 🙂
Unfortunately, GTM’s consent update API doesn’t recognize regions, so the update will apply to all regions. The consent listener doesn’t recognize regions either. So the consent_granted dataLayer events might not work as intended.
To me it looks like the regions have been designed mainly for “Advanced Consent Mode” use.
Great article you posted with easy to follow steps! I’ve been having an issue lately though that I cannot seem to solve, but you briefly mentioned about.
The consent message that appears within Tag Assistant gives me a warning message that “a tag read consent state before a default was set”. What do I do exactly to fix this? I used the default consent state tag to be fired using the Consent Initialization all pages trigger, but this does not seem to solve the problem. What am I missing here?
Also, if we have multiple geolocation rules with different consent states – for example, US consent granted while in Europe consent state is set to denied – we would have to set up two default consent states specifying the regions, correct? However, when debugging it using VPN, both default templates fire at the same time giving me different consent states regardless of my location. What do I do to prevent both templates from firing at the same time? For reference, I’m using Simo Ahava’s template.
Thank you!
Thanks!
I don’t think the “a tag read consent state before a default was set” message is an issue in your case. I’m also seeing it when debugging. It’s not possible to declare the consents before the Consent Initialization event. If the other tags fire on later triggers, they’ll have access to the updated consent preferences set in the Consent Initialization step. That’s the whole point of a dedicated Consent Initialization event, that the consent state gets processed before the subsequent events.
It could be just a UI glitch in Tag Assistant.
Yeah, the regions in Consent Mode are a bit clumsy. You can fire two default consent tags for different regional setups at the same time. You’ll also see the consents set by both of them in Tag Assistant. However, only the one that matches your region should apply.
So don’t mind the two default consents popping up in Tag Assistant. Instead investigate the tags and see that they behave according to the region’s settings that you are in.
Simo’s template uses the same consent APIs as mine, so there should be no difference regarding how the regions work.
Hello again Taneli,
Is there maybe a little glitch in this setup? As I understand, you update page consent settings from the OneTrust cookie if it exists. Let’s say the cookies says “Performance cookies granted” so we update analytics_storage status to “granted” and let all tags requiring analytics_storage granted fire away. But what GTM doesn’t know (yet) is that someone made a change to our OneTrust account, a change that requires re-consent by the user so the consent banner pops up. This time round, the user denies performance cookies. That would mean that we might have done stuff that the user did not consent to. Of course, it might only happen on the first pageview.
Hi,
The variable template used in this solution checks the OneTrust consent preferences in this order:
1. OneTrust’s global variable
2. OneTrust dataLayer messages
3. OneTrust cookie
The cookie is only the last resort in cases the first two are not available.
So in the case you described it comes to the loading order of the scripts. If you load the OneTrust script before the GTM script, then the variable should be able to load the OT preferences from the global variable, even though the dataLyer messages have not yet been pushed.
But yeah, it’s true that if you want to require reconsent from the users for some reason and your OT script is loaded late (perhaps through GTM), then there is a chance that some returning visitors’ data will be collected according to the old consent preferences you had in place earlier, and what was saved in the visitor’s OT cookie. This would only happen between when the GTM script loads and when the OT script loads after it.
That would be one more reason to not load OT through GTM. 🙂
Hello Taneli,
thanks for your detailed article, really helpful.
I’m wondering, is it possible to use your template and update it so I can setup OneTrust manually in the codebase rather than relying on GTM to initialise the OneTrust script?
I know that some browsers and ADBlockers will block GTM from firing, so as a consequence also OneTrust won’t fire if it has been setup via GTM and not in the site directly.
Thanks in advance.
Macchi
Hi,
You can setup OneTrust directly in the codebase. In fact, that’s also the approach that I prefer instead of loading the script via GTM.
The consent integration using the templates works the same way regardless if the OT script itself is implemented via GTM or not.
Hello,
Thanks for the detailed implementation !
Got a question though, on both initial and update setup, security_storage is always denied should it be updated as well based on consent of the user or kept denied always ?
Thanks for the update.
Hi,
I haven’t had any implementations where security_storage would have been used. As far as I know, there’s no OneTrust consent group that would map to security_storage either. If you don’t use it with any tag, then it doesn’t make any difference if it’s set to denied or granted.
You can now also set it to “(not set)” in the template. That will ignore security_storage alltogether so you won’t see it in the consent preview.
Hi Taneli –
Great article.
I have 5 sites to enable this on so this will be super useful.
Can I ask why you chose not to use the OneTrust CMP Template that’s available in the Tag Manager Community? Perhaps it’s as hit and miss as the AutoBlock (which drove me insane) 🙂
Cheers
Hey Taneli!
Thanks for a such detailed instruction on the implementation and sharing your templates. Those are incredibly helpful!
I’ve got a question, since I’m still a bit confused. So, for example, I have G2-tracking script installed via GTM. When I check Cookies-tab in the browser I can see several cookies comes from the g2.com. And while I guess that “__cf_bm”-cookie belongs to Necessary category, I ‘m not sure what “_g2_session_id” actually does. Is that Performance or Targeting type of cookie? Ok, let’s assume it’s a Targeting one. What is not clear for me is when I check “Require additional consent for tag to fire” and set it to “functionality_storage” for example for the G2-script, I block ALL cookies coming from g2.com and it doesn’t matter if they are Necessary, Functional or Targeting.
Is that correct?
Hey Taneli,
This guide was very helpful.
One issue I have run into is that the listener for [consentlevel]_granted is not always firing, which for me means that I’m missing some traffic hits on landing pages (before consent is established). I logged everything out in a sandbox and I do not believe it’s due to your implementation of the listener in the community template. The addConsentListener call appears correct to me and works some of the time. I believe Google’s listener is simply not firing sometimes when the consent values are established. Have you run into this? Any suggestions?
Thanks in advance,
Andrew
Hi Andrew,
Yes, I’ve run into this in some containers, while in others it still works without an issue. Google made some changes to the internal consent APIs during the Consent Mode V2 update last March. The issues started then.
I’ve noticed that it sometimes takes a bit of time for the consent listener to “wake up”. If the events don’t fire when the consent is granted first, you can try to deny the consents again and then grant them again. You should see the missing events then. I suspect that this is due to some race condition in the underlying APIs.
I made an update to the GTM Consent Configuration template recently, that makes it easy to fix this issue.
Solution:
1. Disable the consent listener in the “default” initialization tag.
2. Create a new tag using the same tag template. Select the new “Consent update listener only” option in the tag. The tag will then only set the consent listeners. Select a trigger that fires immediately after the default consent tag, for example Initialization.
Adding the consent listeners during a separate event after setting the intial consents will solve the issue.
I’ve also tried other options such as using the addEventCallback API for hooking up the listeners with a delay. It works as well, but the delay is too long. Using a separate tag seems to be the best option.
I’ll probably write a separate blog post or update this post later. 🙂
Thank you Taneli, this is incredibly insightful.
I followed everything to the letter; the consent states are successfully set to ‘denied’ on page load, and switch to ‘granted’ as I click Accept on the OT banner.
The issue I’m facing though, is that all the tags that are blocked by the initial denied state will remain “Not Fired” until I reload the page. Once I reload, they will move to the “Tags Fired” section successfully.
Is this the expected behavior or is there something I’m missing?
Do I need to set up an extra trigger that listens to events like “analytics_storage_granted” etc?
Yes, that is what he refers to as “consent granted triggers” above. You are on the right track.
Hello, should this be updated to include a 5th consent group, i.e. CT – OneTrust – Social Media? I’m seeing onetrust using that now as a category.
Also, I assume that CT – OneTrust – Functional Consent = the C0003 group ID right?
Thanks!
Hi,
There can be some differences regarding this depending on how OneTrust is configured. Because of that, I don’t think there is a one size fits all answer.
On some sites the social media trackers would be tied to the Advertising Consent category, while others might split it into its own Social Media category, like you mentioned.
In setups I manage, the C0003 id maps to Personalization Consent. But again, that can differ based on how OneTrust is set up.
To get absolute confidence, you can test it yourself by switching a consent category on and off via the consent banner on the site. See how the OptanonConsent cookie in your browser reacts.
The cookie value has a section like this that always reflects the latest selections in the banner:
groups=C0001:1,C0005:1,C0002:1,C0004:1,C0003:1
My AI agent told me this, it might be worth looking into.
Risk
Sensitive data exposure
Primary cause
copyFromWindow can copy values from window into the template and those values may be pushed to queues or dataLayer.
Mitigation
Restrict copyFromWindow permission; avoid copying entire window; sanitize before pushing.
https://developers.google.com/tag-platform/tag-manager/templates/sandboxed-javascript
Hi Mike!
That’s a false alarm. The copyFromWindow and other global variable permissions are already limited in the template.
The GTM Consent Configuration (Consent Mode) template file’s permissions list the global variables it can read and write explicitly. These are:
1. dataLayer
2. clarity
3. uetq
4. clarity.q
In fact, copyFromWindow is always limited. You can’t grant it wildcard permission to copy the entire window. The global variables in the window that a template is allowed allowed to access must always be listed explicitly, which makes them visible in every template’s details.
See:
https://developers.google.com/tag-platform/tag-manager/templates/api#copyfromwindow
https://developers.google.com/tag-platform/tag-manager/templates/permissions#access_globals